Mail client configuration data:
Login:
Our email address created by: cPanel → Email Accounts
For example: contact@client-domain.eu
Password:
The password we provided when creating the email account.
By choosing POP3, we download e-mails from the server and do not leave a copy of them on it. If we want to synchronize mail on multiple devices, we should choose the IMAP protocol.
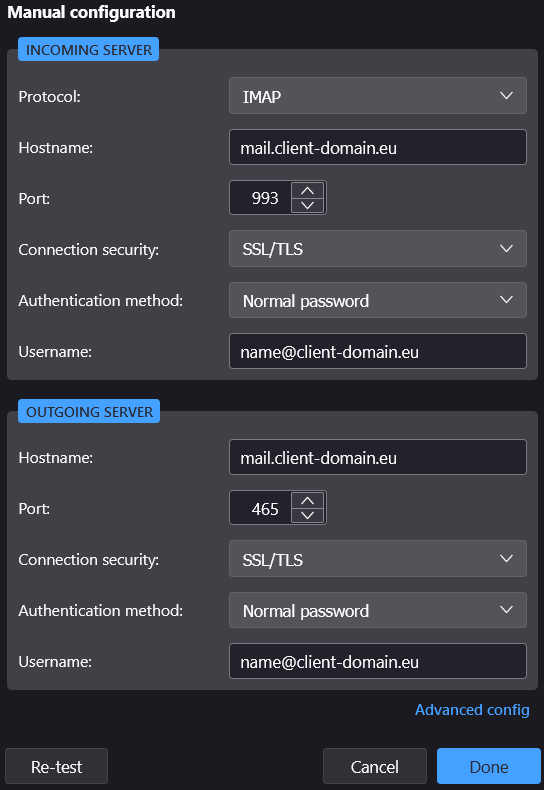
| Connection with SSL/TLS(recommended): Incoming mail server: mail. + our domain np.: mail.client-domain.eu Port IMAP: 993, port POP3: 995 Outgoing mail server: mail. + our domain np.: mail.client-domain.eu Port SMTP: 465 | Connection without SSL/TLS: Incoming mail server: mail. + our domain np.: mail.client-domain.eu Port IMAP: 143, port POP3: 110 Outgoing mail server: mail. + our domain np.: mail.client-domain.eu Port SMTP: 587 |
Sample configuration in Mozilla Thunderbird

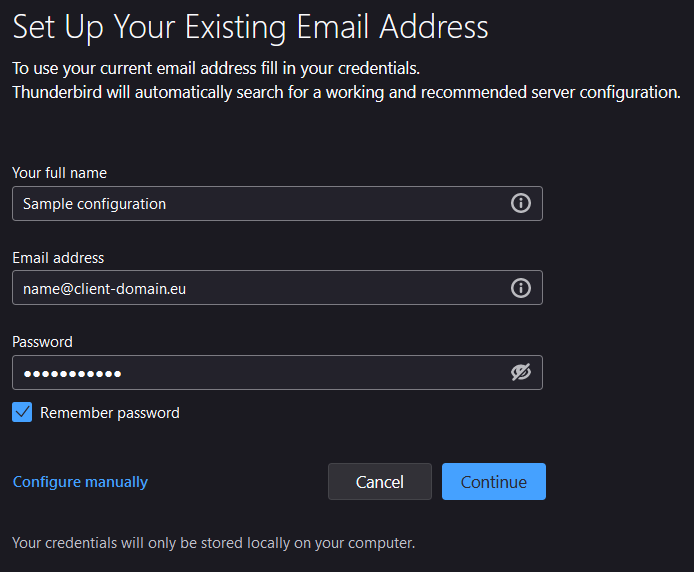
When you open the program for the first time after installation, a window with Configuration of an existing e-mail address will appear. At this point, fill in the fields Name and surname, E-mail address and Password. In the “Name and surname” field, enter your nickname or first and last name. This will make it easier for recipients to identify us. In the “E-mail address” field, enter our address, which we created in the cPanel panel. In the “Password” field, enter the password for your e-mail account. Selecting the “Keep password” option will cause our password to be entered automatically if you need to log in to your account again.
After completing all the items, click on the “Continue” button.
After automatically searching for settings for your e-mail box, click on the “Configure manually” button
At this point, check the configuration of the incoming and outgoing mail servers based on the table presented earlier. In the case of wrong data, they must be modified.

If the data is correct or has been modified, click on the “Done” button..
After completing all the above steps, the main screen of the email program will open.
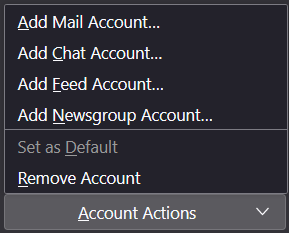
This program allows you to have more e-mail addresses assigned to you. If you want to add another address, click on the gear button in the lower left corner and go to the “Account settings” option. Then expand the “Account Actions” button and select “Add email account configuration…“. At this point, we follow the same steps to add a new email account.

Create a free test account on the Smarthost.au server and check how our e-mail works:
Create a test account with the GOLD-www plan
- Why is Redis better than Memcached? - September 16, 2024
- Installation and launch of Node.js on the Smarthost.eu hosting account - June 20, 2024
- Enable SSL certificate in Open Cart - June 18, 2024

